How to define a send /receive group in Outlook?
By default there is a Send / Receive group created automatically that includes all accounts you added in your Microsoft Outlook, and some Send / Receive groups assigned to one specified account. In some cases, you may add many accounts in Outlook, but work with some of them frequently. Most of time, it is time-consuming to process the sending and receiving for all accounts, and it is not necessary to process the sending and receiving every time for the accounts that you use rarely.
- Automate emailing with Auto CC/BCC, Auto Forward by rules; send Auto Reply (Out of Office) without requiring an exchange server...
- Get reminders like BCC Warning when replying to all while you're in the BCC list, and Remind When Missing Attachments for forgotten attachments...
- Improve email efficiency with Reply (All) With Attachments, Auto Add Greeting or Date & Time into Signature or Subject, Reply Multiple Emails...
- Streamline emailing with Recall Emails, Attachment Tools (Compress All, Auto Save All...), Remove Duplicates, and Quick Report...
Here we will show you a trick about how to custom and define a send / receive group with specified accounts, which will save your time and make your Microsoft Outlook working effectively.
Step 1: Click the Send / Receive Groups > Define Send / Receive Groups in the Send & Receive group on the Send / Receive tab in Microsoft Outlook 2010 and 2013.
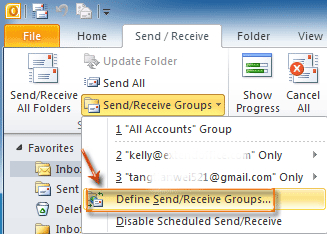
If you are using the Microsoft Outlook 2007, please click the Tools > Send / Receive > Send / Receive Settings > Define Send / Receive Groups.
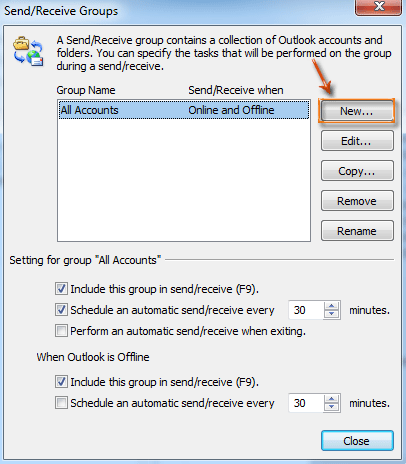
Step 2: In the Send / Receive Groups dialog box, click the New button.
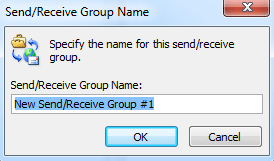
Step 3: In the popping up Send / Receive Group Name dialog box, enter a name for the new defining group in the Send / Receive Group Name: box, and click the OK button.
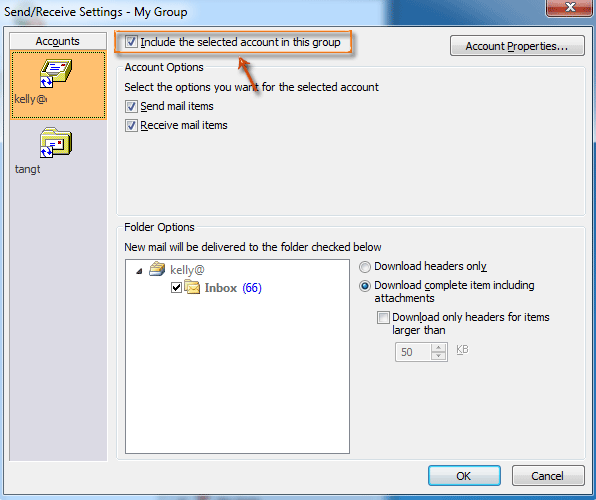
Step 4: In the Send / Receive Settings dialog box,
- Firstly select and highlight an account in the Accounts section at the left;
- Then check the Include the selected account in this group option.
- To add more accounts into this new defining group, please repeat the above two steps.
Step 5: Please click the OK button in the Send / Receive Settings dialog box, and the Close button in the Send / Receive Groups dialog box.
Now the new defining group with specified accounts is created, and you can get it by clicking the Send / Receive Groups in the Send & Receive group on the Send / Receive tab in Microsoft Outlook 2010 and 2013, or clicking the Tools > Send / Receive in Outlook 2007.
Best Office Productivity Tools
Kutools for Outlook - Over 100 Powerful Features to Supercharge Your Outlook
🤖 AI Mail Assistant: Instant pro emails with AI magic--one-click to genius replies, perfect tone, multilingual mastery. Transform emailing effortlessly! ...
📧 Email Automation: Out of Office (Available for POP and IMAP) / Schedule Send Emails / Auto CC/BCC by Rules When Sending Email / Auto Forward (Advanced Rules) / Auto Add Greeting / Automatically Split Multi-Recipient Emails into Individual Messages ...
📨 Email Management: Easily Recall Emails / Block Scam Emails by Subjects and Others / Delete Duplicate Emails / Advanced Search / Consolidate Folders ...
📁 Attachments Pro: Batch Save / Batch Detach / Batch Compress / Auto Save / Auto Detach / Auto Compress ...
🌟 Interface Magic: 😊More Pretty and Cool Emojis / Boost Your Outlook Productivity with Tabbed Views / Minimize Outlook Instead of Closing ...
👍 One-click Wonders: Reply All with Incoming Attachments / Anti-Phishing Emails / 🕘Show Sender's Time Zone ...
👩🏼🤝👩🏻 Contacts & Calendar: Batch Add Contacts From Selected Emails / Split a Contact Group to Individual Groups / Remove Birthday Reminders ...
Over 100 Features Await Your Exploration! Click Here to Discover More.

