Insert a checkbox in Word (Interactive and print-only)
Whether you're compiling a checklist, crafting a feedback form, or constructing a survey, incorporating checkboxes can allow respondents to easily indicate their choices. This guide will demonstrate how to add interactive checkboxes for digital documents and non-interactive checkboxes for those intended for printing in Microsoft Word.
|
Add a clickable checkbox in Word
Clickable checkboxes in Word are ideal for electronic documents where you want users to interact directly by checking or unchecking boxes.
Insert a clickable checkbox using the Developer tab
The Developer tab on the Word Ribbon is essential for adding checkboxes to electronic documents, enabling direct user interaction on their computers.
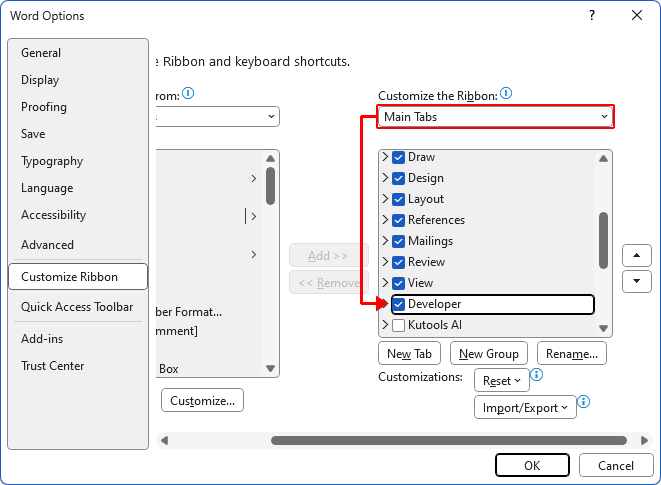
Step 1: Enable the Developer tab (Skip if Developer is already on your Word ribbon)
- Click File > Options > Customize Ribbon.
- Under the Main Tabs, check the Developer box and click OK.

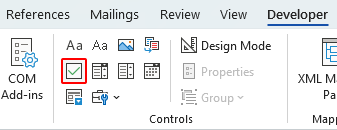
Step 2: Insert a clickable checkbox
- Place the cursor where you wish to add a checkbox.
- On the Developer tab, in the Controls group, click the checkbox icon to insert it into your document.

Result
An interactive check will be inserted to your document at the cursor's current location. You can click on the checkbox to mark it as checked.

Note: To create a checklist in Word as shown below, you can select the inserted checkbox and press Ctrl + C to copy it, then paste it wherever needed using Ctrl + V.

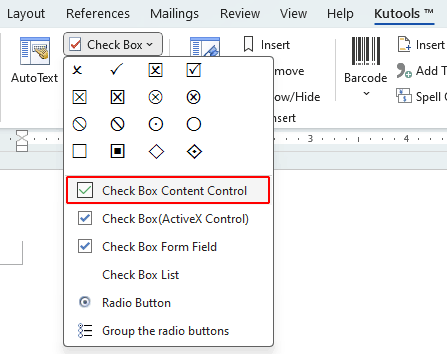
Insert a clickable checkbox without using the Developer tab
If you prefer not to use the Developer tab, Kutools for Word offers an alternative with its robust features for inserting interactive checkboxes.
- Place the cursor where you wish to insert a checkbox.
- On the Kutools tab, click Check Box > Check Box Content Control.

Result
An interactive check will be inserted to your document at the cursor's current location. You can click on the checkbox to mark it as checked.
Notes:
- Kutools offers three types of checkboxes. For straightforward, easy-to-use checkboxes ideal for forms, we recommend the Check Box Content Control, as outlined in previous steps. For customizable, programmable interactions, choose ActiveX Control checkboxes. To ensure compatibility with older versions of Word, opt for Form Field checkboxes.
- To make a checklist in Word, you can select the inserted checkbox and press Ctrl + C to copy it, then paste it wherever needed using Ctrl + V.
- Want to access the Check Box utility? Download Kutools for Word now! Beyond this, Kutools boasts a myriad of 100+ other features and offers a 60-day free trial. Don't wait, give it a try today!
Edit a clickable checkbox in Word
By default, an X will appear in the checkbox once it is selected:  . To change the X to a check mark (√) for instance, please follow the steps below:
Step 1: Enable the Developer tab (Skip if Developer is already on your Word ribbon)
- Click File > Options > Customize Ribbon.
- Under the Main Tabs, check the Developer box and click OK.
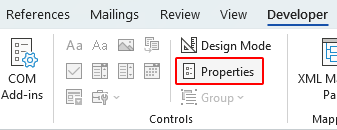
Step 2: Edit the checkbox
- Select the checkbox you want to modify.
- On the Developer tab, select Properties.
- In the Content Control Properties dialog box that appears:
- Click on the Change button next to the Checked symbol.
- In the Font box, select Wingdings 2.
- Choose the symbol you wish to use as the checked indicator (for example, a check mark within a box).
- Click OK in the Symbol dialog.
- Click OK in the Content Control Properties dialog.


Result
Now, when you check the checkbox, a check mark will appear within the box.

Insert a print-only checkbox for printed Word documents
For documents intended to be printed and filled out manually, interactive checkboxes aren't necessary. Instead, using checkbox symbols is a simpler and more efficient approach, particularly beneficial for lengthy lists.
Insert a print-only checkbox using bullets in Word
To easily insert checkboxes in your printed document using Word's bullet feature, follow these steps:
Step 1: Select the items to which you want to prepend checkboxes
Step 2: Set up a checkbox as a bullet
- On the Home tab, in the Paragraph group, click the dropdown arrow beside the Bullets button, and select Define New Bullet.
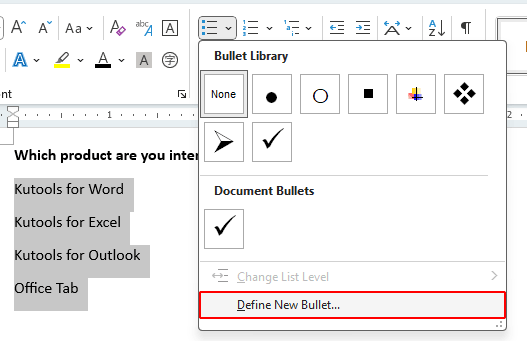
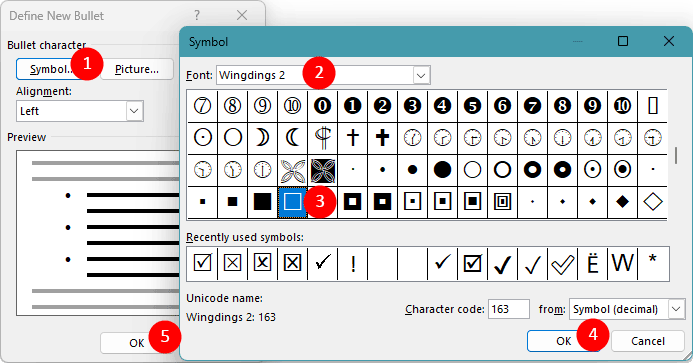
- In the Define New Bullet dialog that appears:
- Click the Symbol button.
- Select the Wingdings 2 font in the Font box.
- Choose the checkbox symbol. You can enter the code 163 in the Character code box to quickly select the symbol.
- Click OK in the Symbol dialog.
- Click OK in the Define New Bullet dialog.


Result
Checkboxes will now appear as bullets before each selected list item, making the document ready for printing and easy manual marking.

Note: After setting up the checkbox bullets, each time you press Enter at the end of a list item, a new checkbox will automatically be added to the next line, simplifying the process of extending your list.
Insert a print-only checkbox using a versatile tool
With Kutools for Word, you can insert a checkbox list into your document with just a click, bypassing the need to define bullets manually. This tool simplifies the process, making it quick and efficient.
- Highlight the text or list items where you want the checkboxes to appear.
- Navigate to Kutools > Check Box > Check Box List.


Result
Checkboxes will be automatically added before each selected item.

Notes:
- After setting up the checkbox bullets, each time you press Enter at the end of a list item, a new checkbox will automatically be added to the next line, simplifying the process of extending your list.
- Want to access the Check Box utility? Download Kutools for Word now! Beyond this, Kutools boasts a myriad of 100+ other features and offers a 60-day free trial. Don't wait, give it a try today!
Above is all the relevant content related to inserting a checkbox in Microsoft Word. I hope you find the tutorial helpful. If you're looking to explore more Word tips and tricks, please click here to access our extensive collection of tutorials.
Best Office Productivity Tools
Kutools for Word - Elevate Microsoft Word with 100+ Powerful Features!
🤖 Kutools AI Assistant: Transform your writing with AI - Generate Content / Rewrite Text / Summarize Documents / Inquire for Information based on Document, all within Word
📘 Document Mastery: Split Pages / Merge Documents / Export Selection in Various Formats (pdf/txt/doc/html...) / Batch Convert to PDF / Export Pages as Images / Print Multiple Files at once...
✏ Contents Editing: Batch Find and Replace across Multiple Files / Resize All Pictures / Transpose Table Rows and Columns / Convert Table to Text...
🧹 Effortless Clean: Sweap away Extra Spaces / Section Breaks / All Headers / Text Boxes / Hyperlinks / For more removing tools, head to the Remove group...
➕ Creative Inserts: Insert Thousand Separators / Check Boxes / Radio Buttons / QR Code / Barcode / Equation Caption / Image Caption / Multiple Pictures / Discover more in the Insert group...
🔍 Precision Selections: Pinpoint Specific Pages / Tables / Shapes / Heading Paragraphs / Enhance navigation with more Select features...
⭐ Star Enhancements: Navigate to Any Location / Auto-Insert Repetitive Text / Seamlessly Toggle Between Document Windows / 11 Conversion Tools...
👉 Want to try these features? Kutools for Word offers a 60-day free trial, with no limitations! 🚀
