Apply and create custom multilevel Lists in Word – Step by step tutorial
A multilevel list is a list with items categorized in multiple tiers or levels. Each level has a different indent or numbering style to show the hierarchy and relationship between items. This kind of list allows you to present information in layered levels of detail, making complex data easier to understand and navigate.
Multilevel lists in Microsoft Word can incorporate both numbered and bulleted formats. A particularly useful feature of these lists is their automatic updating capability. When you insert a new paragraph into the middle of a numbered list or adjust the order of existing items, Word automatically updates the numbering to ensure the list maintains its correct sequence. Here’s a detailed guide on how to apply and customize multilevel lists in Word.

Apply a multilevel list in Word
To apply the multilevel list is very easy in Word, please do with the following steps:
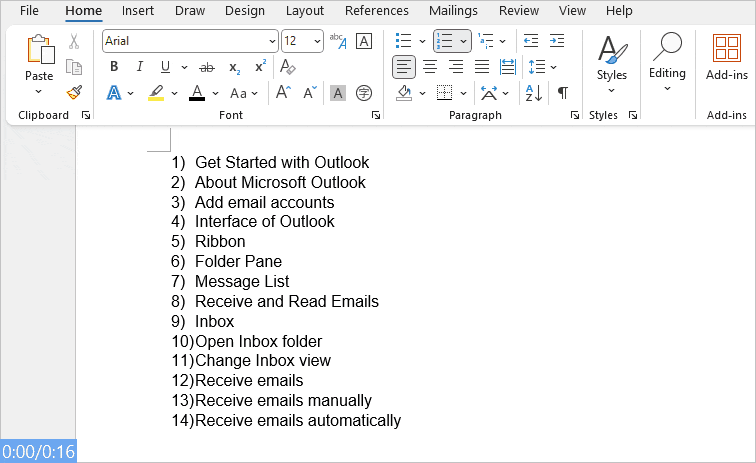
- Type your text lists, and then select them.

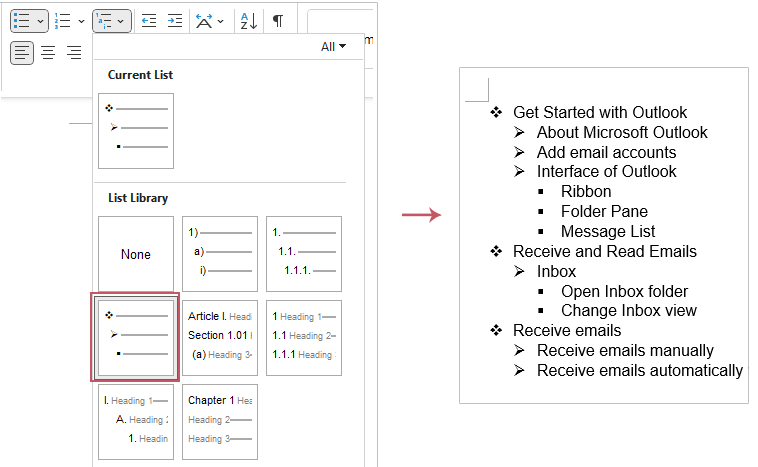
- Then, go to the Home tab, in the Paragraph group, click on the Multilevel List
 icon. Select a style from the list that you want to use. Here, I will select the second list style. See screenshot:
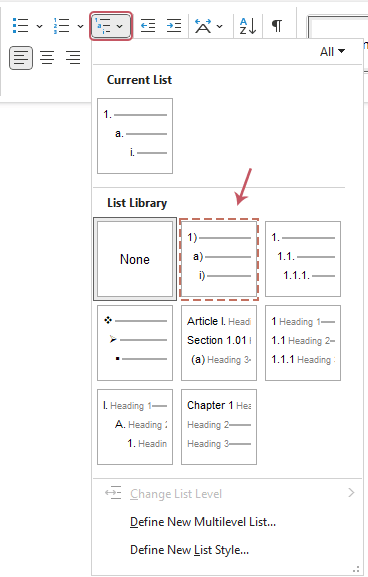
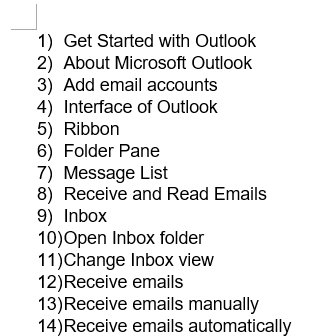
- After applying the multilevel list, your list will now be formatted in the style you chose. It displayed as a single-level list. See screenshot:
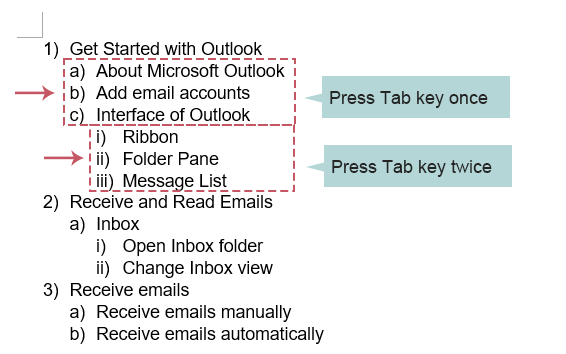
- Then, you should use the Tab key to create multilevel lists. Place the cursor at the beginning of the text, or select the text lists, press Tab key once to move the text one level deeper. If you press the Tab key multiple times, each press moves the paragraph further down into increasingly deeper levels of the list. See screenshot:


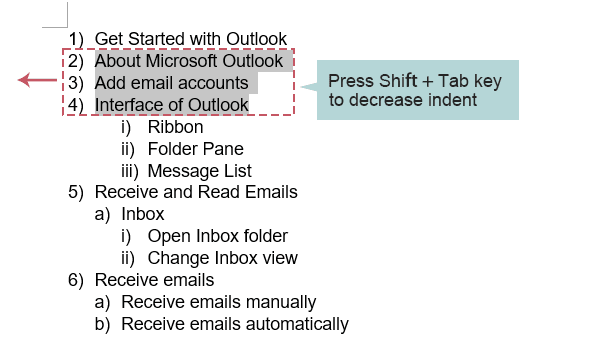
- To move a line back to a higher level in the list, place your cursor at the start of the line or select the lines and then, press Shift+Tab keys.
- You can also adjust the indentation of your list by using the Increase Indent and Decrease Indent buttons on the ribbon to customize the indent level according to your needs. see the demo below:
- If you want to change the multilevel list style, click Multilevel Lists dropdown menu again, and this time, just click any of the other default list types on the menu you need, see screenshot:


Create custom multilevel list in Word
If the preset formats do not meet your specific needs, you can create a custom multilevel list format to better suit your requirements. This section will walk you through the process of customizing a multilevel list tailored to your specific needs.
Step 1: Access to the Define New Multilevel List dialog
On the Home tab, click the Multilevel List ![]() button. And then, select the Define New Multilevel List option, see screenshot:
button. And then, select the Define New Multilevel List option, see screenshot:
Step 2: Customize list levels and apply it
To customize the formatting for each level of your list. In the opened Define New Multilevel List dialog box:
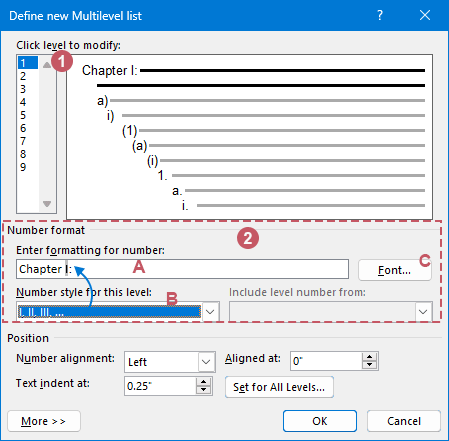
I. Setup the first list level
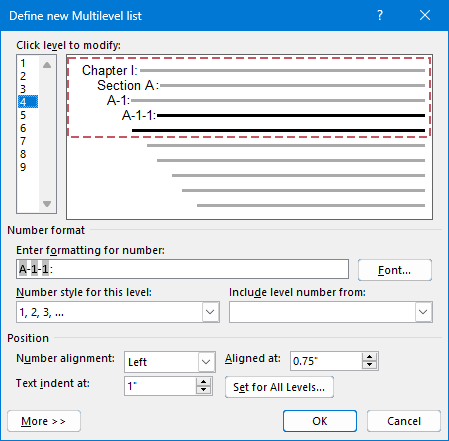
- In the Click level to modify section, click to select the list level you want to change. In the upper left box, you can select the level of numbering. When you click on a level, the corresponding section in the right box will turn black. Here, I will select the first level.
- In the Number format group:
- In the Enter formatting for number text box, Word shows the number formatting for the chosen list level. You can type modifications directly into this box to change the format of the text.Note: In the Number format text box, the shaded area represents the numbering, which cannot be altered. If you replace it, even with another number, it will disrupt the automatic numbering and all numbers in the list will become identical. However, you can enhance the format by adding text and symbols before and after this shaded number.
- In the Number style for this level drop-down list, select the number format you want to use. You can change it to any number or bullet style you want.
- Click Font button to customize the font formatting. Here, you can select your desired font, font style, size, and additional attributes like color or effects.
- In the Enter formatting for number text box, Word shows the number formatting for the chosen list level. You can type modifications directly into this box to change the format of the text.

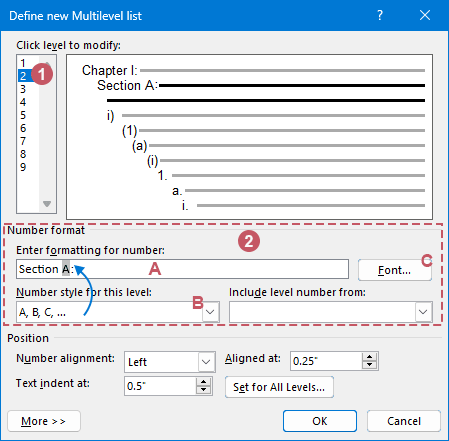
II. Setup the second and other list levels
- In the Click level to modify section, click to select the second list level you want to change.
- In the Number format group:
- In the Enter formatting for number text box, type modifications directly into this box to change the format of the text.
- In the Number style for this level drop-down list, select the number format you want to use. You can change it to any number or bullet style you want.
- Click Font button to customize the font formatting. Here, you can select your desired font, font style, size, and additional attributes like color or effects.
- Repeat the above steps to set the formatting for other list levels. Here, I will set four level list, and you should delete or set other list levels as none. See screenshot:
 📝 Tips:
- Include level number from: This option allows you to incorporate the number from a higher level into the numbering of a current level. This drop-down list is not available for the first level, as there are no higher levels above it to reference.
For instance, if Level 1 is numbered using 1, 2, 3 and Level 2 uses a, b, c, selecting Level 1 from the Include level number from drop-down for Level 2 will change the numbering of Level 2 to 1a, 1b, etc.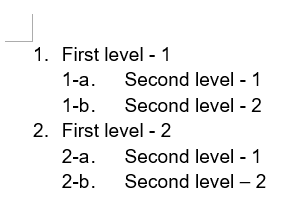
- Position: In this section, you can adjust the alignment and indentation of the selected number level using the available controls. If you want to apply these settings to your entire list, click the Set For All Levels button.
- Include level number from: This option allows you to incorporate the number from a higher level into the numbering of a current level. This drop-down list is not available for the first level, as there are no higher levels above it to reference.
- Finally, click OK button. The multilevel list you created appears in both the Current List group and the Lists in Current Documents group within the multilevel list menu. See screenshot:
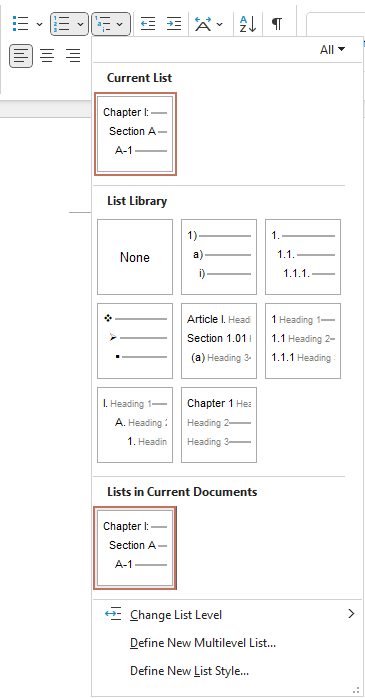
- Then, apply the new multilevel list style to your selected text, see screenshot:


☑️ Some additional options
There are more additional options in the Define new Multilevel list dialog box, click More button in the lower-left corner. Word expands the dialog box by adding an extra panel on the right, allowing you to view the entire dialog box.
| Option | Description |
| Linking to a Style | To associate a numbered list level with a particular style, use the Link level to style drop-down list to select the style. |
| Customizing Starting Number | To change where numbering begins for a list level, adjust the Start at spinner. |
| Restarting Numbering | If you want the numbering to restart after a certain level, check the Restart list after box and select the appropriate level from the drop-down list. Note that this option isn't available for the first level, as there is no higher level to trigger a restart. |
| Using Legal-Style Numbering | For legal-style numbering (which uses consecutive Arabic numerals like 1.1.1 instead of mixed styles like A.1.1), check the Legal style numbering box. |
| Following Characters | Decide what character follows the numbering, — Tab character, Space, or Nothing. If you select a Tab character, you can also set a specific tab stop by checking the Add tab stop at box and entering a distance. |

Convert auto-numbering list to text in word
Auto-numbering in Microsoft Word helps maintain organized lists, but sometimes the numbering can interfere with layout changes, document formatting, or data export. Converting these lists to text can resolve such issues. In this section, I'll introduce a handy tool – the List to Text feature from Kutools for Word. This feature allows you to convert an auto-numbered list to plain text with just a single click.
After installing Kutools for Word, select the auto-numbering list text, and then click Kutools > List to Text, the auto-numbering list will be converted to text at once, see screenshot:

This guide offers a thorough walkthrough on using, applying, and customizing multilevel lists in Microsoft Word, alongside a practical solution for converting auto-numbered lists to plain text using Kutools for Word. To explore more tips and tricks for Microsoft Word, please click here to view additional options.
Related Articles:
- Insert bullet between words in Word
- May be it is easy for us to insert a list of bullets before the text in a Word document, but, if you need to insert the bullet between words in a line, how could you do?
- Reverse numbering or bullet list in Word
- If you have a list, and you want to reverse the words order in the list, the first idea that first flash in your mind will be copying and pasting them one by one. But it will be troublesome to reverse them by this way if there are numerous words lines. Is there any easy way to solve this problem?
- Stop auto numbering feature in Word
- By default, when you type 1. into the Word document, it will be recognized as numbering list, so when you press Enter key, a number list 2. will be inserted automatically. Sometimes, this may be annoying for your daily work, how could you stop this auto numbering feature in Word?
- Convert multiple numbering or bullet lists to plain text in Word
- If you need to convert multiple automatic numbering or bullet lists to text, you can quickly get it done by the following methods.
Best Office Productivity Tools
Kutools for Word - Elevate Your Word Experience
🤖 Kutools AI Features: Generate Content / Rewrite Text / Document Q&A / Get Quick Answers / Translate documents / Polish Document (Preserve Format)...
📘 Document Mastery: Split Pages / Merge Documents / Export Selection in Various Formats (PDF/TXT/DOC/HTML...) / Batch Convert to PDF...
✏ Contents Editing: Batch Find and Replace across Multiple Files / Resize All Pictures / Transpose Table Rows and Columns / Convert Table to Text...
🧹 Effortless Clean: Sweap away Extra Spaces / Section Breaks / Text Boxes / Hyperlinks / For more removing tools, head to the Remove group...
➕ Creative Inserts: Insert Thousand Separators / Check Boxes / Radio Buttons / QR Code / Barcode / Multiple Pictures / Discover more in the Insert group...
🔍 Precision Selections: Pinpoint Specific Pages / Tables / Shapes / Heading Paragraphs / Enhance navigation with more Select features...
⭐ Star Enhancements: Navigate to Any Location / Auto-Insert Repetitive Text / Toggle Between Document Windows / 11 Conversion Tools...

Best Office Productivity Tools
Kutools for Word - 100+ Tools for Word
- 🤖 Kutools AI Features: Generate, Rewrite, Summarize, Translate Documents / Get Quick Answers / Polish Document (Preserve Format)
- 📘 Document Mastery: Split Pages / Merge Documents / Batch Convert to PDF
- ✏ Contents Editing: Batch Find and Replace / Resize All Pictures
- 🧹 Effortless Clean: Remove Extra Spaces / Remove Section Breaks
- ➕ Creative Inserts: Insert Thousand Separators / Insert Check Boxes / Create QR Codes