Batch Replace in Word – Find and Replace Across Multiple Documents at Once
Kutools for Word
Updating text across multiple Word documents can be a time-consuming task, especially when the same content appears in dozens or even hundreds of files. Whether you need to replace a company name, update contact information, remove unwanted formatting, or standardize document content, manually opening and editing each file is inefficient and error-prone.
Kutools for Word's Batch Replace feature simplifies this process by allowing you to find and replace text, special characters, and formatting across multiple files simultaneously. It supports Word documents, TXT files, and HTML files, while also providing advanced capabilities such as searching in headers, footers, comments, text boxes, and more.
In this guide, you'll learn how to use both Simple Mode and Advanced Mode of Batch Replace to perform fast and accurate batch replacements.
- Example 1: Search and Replace Text in Headers, Footers, Comments and Text Boxes
- Example 2: Clean Up Documents with Special Characters
- Example 3: Perform More Precise Searches (match case, whole word, wildcards…)
- Example 4: Find and Replace Certain Formatting
- Batch Add in Advanced Mode
- Highlight Matching Results
- Manage Find-and-Replace Rules Efficiently
- Save and Reuse Frequently Used Replacement Tasks
- Export Reports
Why Use Batch Replace?
Traditional Find and Replace in Microsoft Word only works within the currently opened document and typically handles one find-and-replace rule at a time. When you need to update multiple files or perform multiple replacement tasks, you must repeat the same operation again and again.
Batch Replace is designed to eliminate that repetitive work by allowing you to:
- Search and replace text across multiple documents at once
- Process entire folders of Word files
- Apply multiple find-and-replace rules in a single operation
- Find and replace content in TXT and HTML files
- Replace special characters such as paragraph marks and tabs
- Search in headers, footers, comments, footnotes, and text boxes
- Find and replace specific formatting
- Save reusable replacement scenarios
- Generate detailed replacement reports
Whether you're updating contracts, reports, manuals, templates, or website content, Batch Replace can dramatically reduce editing time.
Understanding Simple Mode and Advanced Mode
Batch Replace offers two working modes to accommodate different types of tasks.
Simple Mode is designed for everyday text replacement tasks. It provides a clean interface for quickly replacing content across multiple files.
Advanced Mode includes additional options for more complex scenarios, such as:
- Special character replacement
- Header and footer searching
- Wildcard searches
- Formatting replacement
- Highlighting matches
If your goal is simply to replace ordinary text in the main document, Simple Mode is usually sufficient. For more precise control, switch to Advanced Mode.
Use Simple Mode for Quick Batch Text Replacement
Simple Mode is the fastest way to perform batch replacements. In this example, we'll update company information across multiple documents.
Example: Replace Company Information Across Multiple Documents
Suppose your company has changed its name from ABC Technology Ltd. To ABC Software Solutions Ltd.
Instead of opening and editing each document individually, Batch Replace can update all files in one operation.
Step 1. Enable the Batch Replace feature
Click Kutools > Batch Replace to open the Batch Replace dialog box.

Step 2. Switch to the Simple Mode
When you open the Batch Replace dialog, it starts in Advanced Mode by default. To perform a basic batch replacement task, click the Advanced Mode button in the upper-right corner of the dialog box to switch to Simple Mode.

Step 3. Select Documents
In the Batch Replace dialog box, choose the files you want to process first.
Here are three document sources:
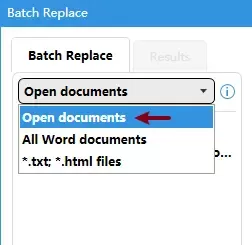
- Open DocumentsSelect this option when the target Word documents you want to perform are already open.
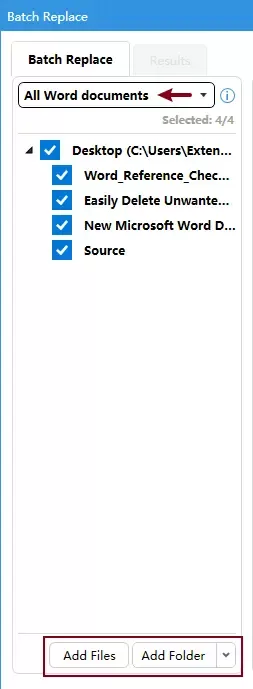
- All Word DocumentsSelect this option when you want to process files stored on your computer.After selecting All Word Documents, you can:
- Click Add Files to select individual documents.
- Click Add Folder to import all supported Word files from a folder.
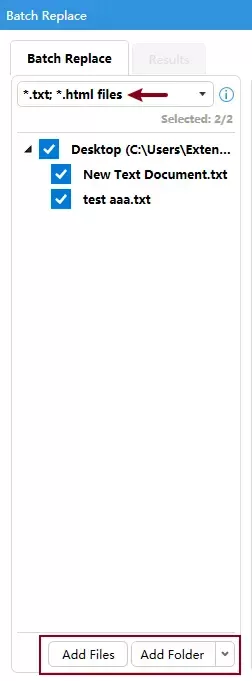
- TXT and HTML FilesBatch Replace is not limited to Word documents. You can also process TXT files and HTML files.After selecting *.txt; *.html files, click Add Files to add the .txt or .html files one by one; Or click Add Folder to import all .txt and .html files from a certain folder.


Step 4. Add Find and Replace Rules
By default, a blank find-and-replace rule is already created. Simply enter the text you want to search for in the Find column and the replacement text in the Replace with column.
For example, enter ABC Technology Ltd. in the Find column and ABC Software Solutions Ltd. in the Replace with column.


Batch Add Find and Replace Rules
Click Batch Add to open the Batch Add dialog box. Here, you can:
- Enter multiple find-and-replace pairs manually.
- Import search terms and replacement values from TXT or CSV files.
Each line in the Find file corresponds to the matching line in the Replace file.

Step 5. Run Find or Replace
After creating your replacement rules, choose one of the following actions.
- Find: Scans the selected files and displays all matches without making any changes.
- Replace: Performs the replacement immediately according to the rules you've configured.
Running a Find operation first is often recommended when working with important documents.

Step 6. Review Results
After clicking Find, Batch Replace automatically switches to the Results tab and displays the search results.
If you click Replace, a confirmation message will appear indicating how many files will be modified. Click OK to proceed with the replacement. Once the replacement is complete, Batch Replace automatically switches to the Results tab to display the replacement results.
In the Results tab, you can review:
- The total number of files processed
- The number of successful operations
- The number of failed operations
- The total number of matches found
- Detailed results for each file

Use Advanced Mode for More Powerful Search and Replacement Tasks
Advanced Mode extends Batch Replace beyond ordinary text replacement and gives you greater control over how content is searched and replaced.
Example 1: Search and Replace Text in Headers, Footers, Comments and Text Boxes
Many Word documents contain important information outside the main document body.
Examples include:
- Company names in headers
- Copyright information in footers
- Reviewer comments
- Text stored inside text boxes
- References in footnotes and endnotes
In Advanced Mode, you can use the Find in section to specify where Batch Replace should search.
Step 1. Click Kutools > Batch Replace to enable the feature
Step 2. Configure the Batch Replace dialog box
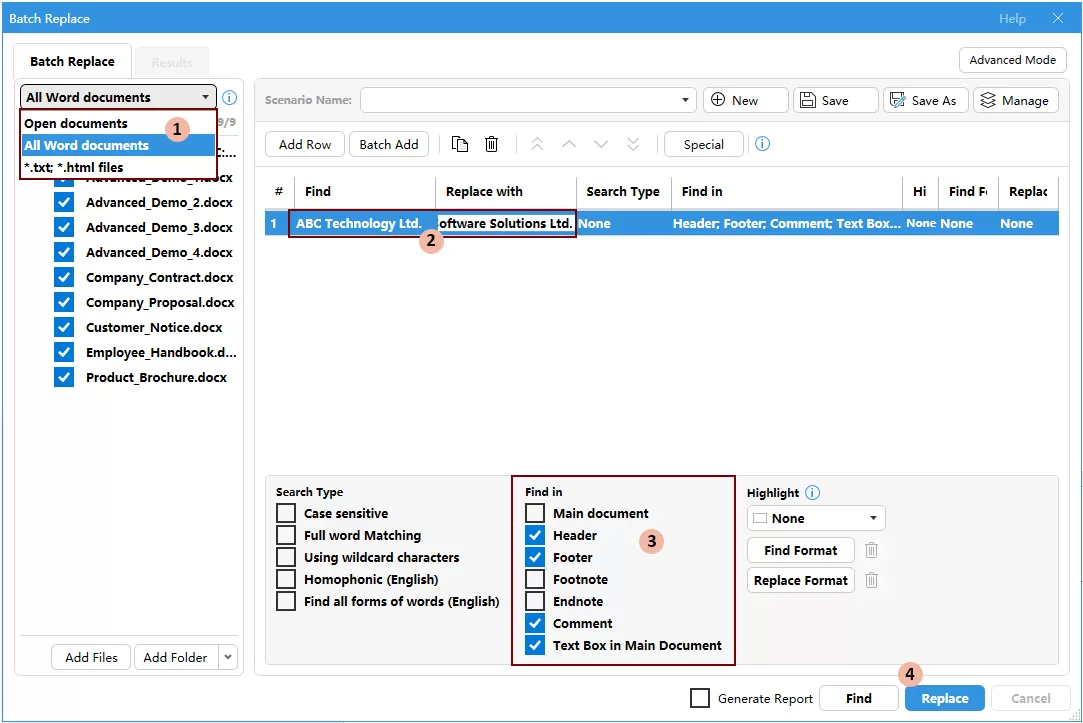
- In the drop-down list in the left pane, choose the document source you want to process, then select the target files.
- Add a find-and-replace rule by entering the text to search for in the Find column and the replacement text in the Replace with column. Note: If you need to create multiple replacement rules, click Add Row to add additional rules one by one, or use Batch Add to create or import multiple rules at once. Click here to learn more about Batch Add.
- In the Find in section, select the locations where the replacement should be performed, such as Header, Footer, Comment, and Text Box in Main Document.
- Click Find to preview the matches or Replace to perform the replacement.

Result
After clicking Find, Batch Replace automatically switches to the Results tab and displays the search results.
If you click Replace, a confirmation message will appear indicating how many files will be modified. Click OK to proceed with the replacement. Once the replacement is complete, Batch Replace automatically switches to the Results tab to display the replacement results.
In the Results tab, you can review:
- The total number of files processed
- The number of successful operations
- The number of failed operations
- The total number of matches found
- Detailed results for each file

Example 2: Clean Up Documents with Special Characters
Documents imported from external systems, websites, or other applications often contain unwanted formatting, such as extra blank lines, tab characters, multiple spaces, or unnecessary section breaks. These formatting issues can make documents difficult to read and maintain.
The Special menu in Batch Replace allows you to quickly locate and replace special characters across multiple documents at once.
In this example, you'll learn how to:
- Remove extra blank lines (Paragraph Marks)
- Replace tabs with spaces
- Replace multiple consecutive spaces with a single space
- Remove section breaks from multiple documents
Step 1. Click Kutools > Batch Replace to enable the feature
Step 2. Configure the Batch Replace dialog box
- In the drop-down list in the left pane, choose the document source you want to process, then select the target files.
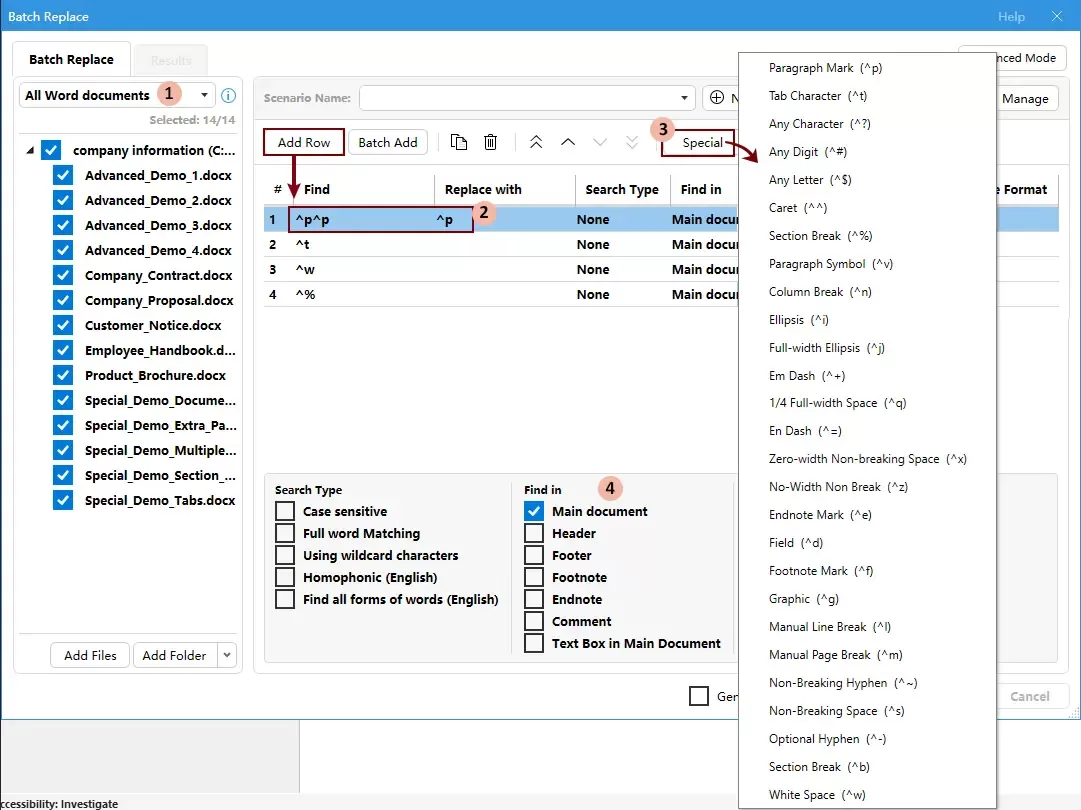
- Add the required find-and-replace rules.Click Add Row to create additional find-and-replace rules as needed. Then enter the appropriate special characters in the Find and Replace with columns.For example, to remove extra blank lines, click in the Find column, then click Special and select Paragraph Mark twice to insert ^p^p. Next, click in the Replace with column and insert a single Paragraph Mark (^p).Tip: To replace tabs with spaces or multiple consecutive spaces with a single space, enter a single space in the Replace with column.Use the following rules to clean up the selected documents:
Find Replace with Purpose ^p^p ^p Remove extra blank lines ^t (single space) Replace tabs with spaces ^w (single space) Replace multiple spaces with a single space ^% (blank) Remove section breaks You can insert these special characters by clicking the Special button and selecting the corresponding item from the menu. - In the Find in section, keep Main document checked.
- Click Find to preview the matches or Replace to perform the replacement.

Result
After clicking Find, Batch Replace automatically switches to the Results tab and displays the search results.
If you click Replace, a confirmation message will appear indicating how many files will be modified. Click OK to proceed with the replacement. Once the replacement is complete, Batch Replace automatically switches to the Results tab to display the replacement results.
In the Results tab, you can review:
- The total number of files processed
- The number of successful operations
- The number of failed operations
- The total number of matches found
- Detailed results for each file

Example 3: Perform More Precise Searches (match case, whole word, wildcards…)
When searching across multiple documents, a standard text search may return too many results or match content you don't actually want to find. Batch Replace provides several advanced search options that help narrow down the results and improve search accuracy.
Step 1. Open the Batch Replace Dialog Box
Click Kutools > Batch Replace to open the Batch Replace dialog box.
Step 2. Configure the Batch Replace dialog
- Select the files to searchIn the left pane, choose the document source and select the files you want to process.
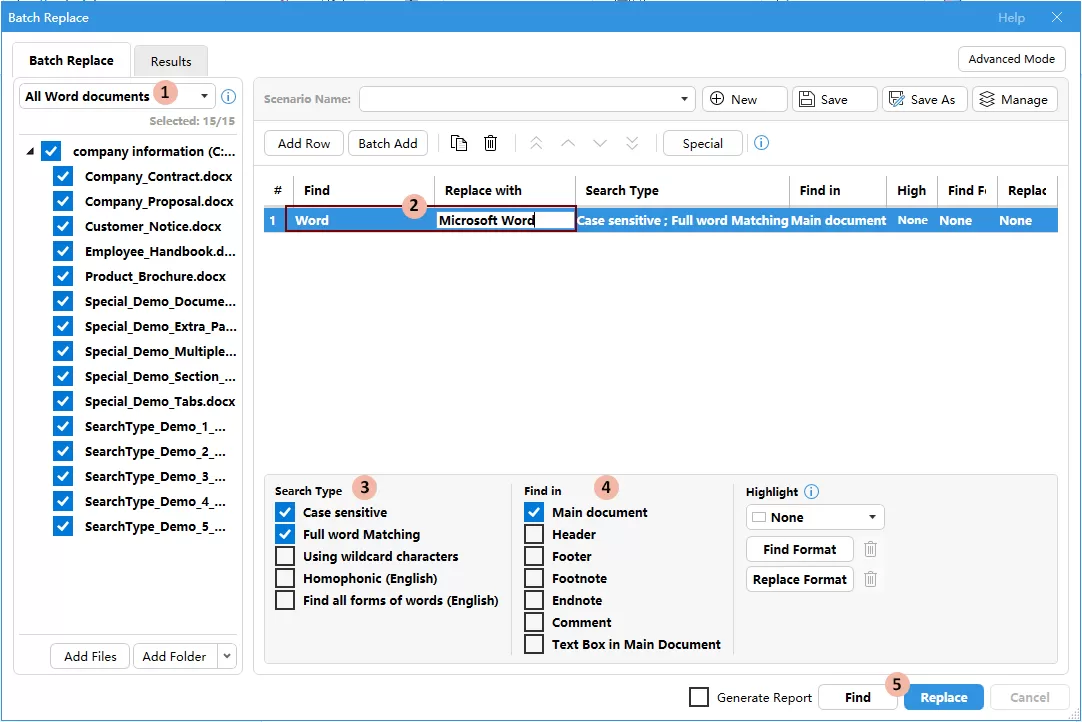
- Add a search rule
- Enter the text you want to search for in the Find column.
- Enter the text you want to replace with in the Replace with column. Tip: Leave the Replace with column empty if you only want to locate matches.
- Enable the required Search TypeIn the Search Type section, select one or more options according to your needs.
- Match Case: Use this option when uppercase and lowercase letters must match exactly.
- Full Word Matching: Use this option to match complete words only.
- Using Wildcard Characters: Wildcards allow you to search for text patterns rather than exact text. For example, searching for Report* can match: Report, Report2025, Report_Final, Report_Draft. This option is particularly useful when file content follows a naming pattern.
- Homophonic (English): Use this option to search for words that sound alike. For example, depending on Word's search engine, words with similar pronunciation may also be matched.
- Find All Forms of Words (English): Use this option to find different grammatical forms of the same word. For example, searching for run may also find runs, running, ran.
- In the Find in section, keep Main document checked or select the locations where the replacement should be performed.
- Click Find to preview the matches or Replace to perform the replacement.

Batch Replace will search all selected files using the specified search options.
Result
After clicking Find, Batch Replace automatically switches to the Results tab and displays the search results.
If you click Replace, a confirmation message will appear indicating how many files will be modified. Click OK to proceed with the replacement. Once the replacement is complete, Batch Replace automatically switches to the Results tab to display the replacement results.
In the Results tab, you can review:
- The total number of files processed
- The number of successful operations
- The number of failed operations
- The total number of matches found
- Detailed results for each file

By using advanced search options, you can significantly improve search accuracy and reduce unwanted matches. These options are especially useful when processing large collections of documents, contracts, reports, manuals, and other business files.
Example 4: Find and Replace Certain Formatting
Sometimes the text itself does not need to be changed, but the formatting does. For example, you may need to remove highlight colors, change font colors, or standardize text styles across multiple Word documents.
Batch Replace allows you to search for formatting only or combine text and formatting criteria in a single operation. This makes it easy to update document styles consistently across multiple files.
Step 1. Open the Batch Replace dialog box
Click Kutools > Batch Replace to open the Batch Replace dialog box.
Step 2. Select the documents to process
In the left pane, choose the document source and select the files you want to process.
Step 3. Configure the formatting replacement rule
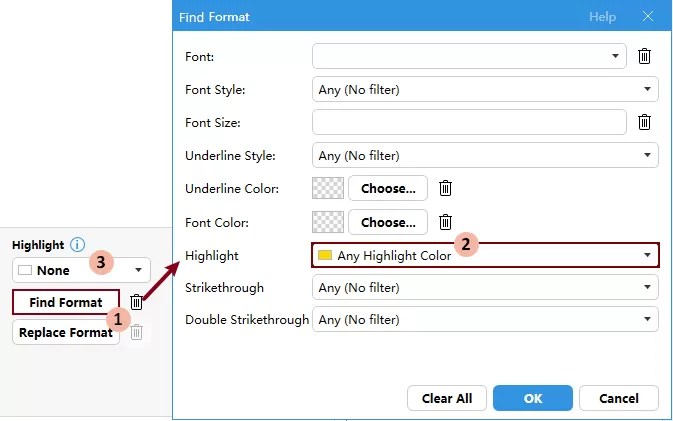
In this example, we will remove all highlight colors from the selected documents without changing the text itself.
- Click Find Format to open the Find Format dialog box.
- In the Highlight drop-down, select Any Highlight Color, and then click OK.
- Now it returns to the Batch Replace dialog box, choose None in the Highlight drop-down list.

Step 4. Specify the search scope
In the Find in section, select the locations where the formatting replacement should be performed. In this example, keep Main document selected.
The Batch Replace dialog box is now displayed as shown below:

Step 5. Run the operation
Click Find to preview the matches or Replace to remove the formatting directly.
Result
After clicking Find, Batch Replace automatically switches to the Results tab and displays the search results.
If you click Replace, a confirmation message will appear indicating how many files will be modified. Click OK to proceed with the replacement. Once the replacement is complete, Batch Replace automatically switches to the Results tab to display the replacement results.
Additional Advanced Features
In addition to its powerful search and replacement functions, Batch Replace provides several advanced features designed to improve efficiency when working with complex replacement tasks and large rule sets.
The following sections introduce these features in more detail.
Batch Add in Advanced Mode
The Batch Add feature is available in both Simple Mode and Advanced Mode. In Simple Mode, it allows you to quickly enter or import multiple find-and-replace rules at once. In Advanced Mode, Batch Add provides additional configuration options, making it easier to create complex replacement tasks.
To use Batch Add in Advanced Mode:
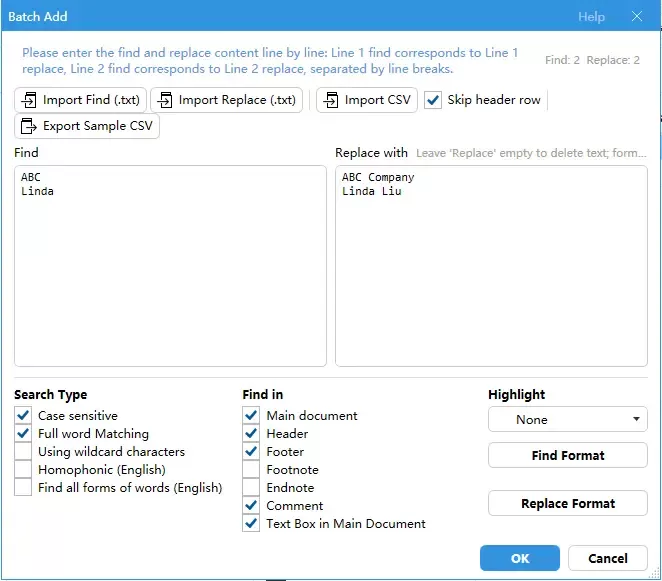
- Click Batch Add.
- Enter multiple find-and-replace pairs manually in the Find and Replace with fields, or import them from TXT or CSV files.
- Configure the desired advanced options, such as Search Type, Find in, Highlight, and so on.
- Click OK to add all rules to the rule list at once.

Highlight Matching Results
The Highlight option allows Batch Replace to automatically apply a highlight color to matching content during a Find or Replace operation.
Each find-and-replace rule can be assigned a different highlight color.
After running the operation, all matching content will be highlighted using the assigned colors, allowing you to quickly identify which rule matched each piece of content.

Manage Find-and-Replace Rules Efficiently
When working with multiple find-and-replace rules, Batch Replace provides several tools to help you quickly create, organize, and manage rule lists.
Duplicate Existing Rules
If a new rule is similar to an existing one, select the rule and click Duplicate Row to create a copy. You can then make minor adjustments without re-entering all settings.

Reorder Rules
Use the Move to Top, Move Up, Move Down, and Move to Bottom buttons to adjust the order of rules.

Delete Multiple Rules at Once
To remove multiple rules simultaneously:
- Hold Ctrl and click the rules you want to select.
- Click the Delete button on the toolbar.
All selected rules will be removed at once.

Keyboard Shortcuts for Faster Rule Entry
Batch Replace supports keyboard shortcuts to speed up rule creation.
- Press Tab in a Find cell to move to the Replace with cell in the same row.
- Press Tab in a Replace with cell to move to the Find cell in the next row.
- Press Enter to move to the next row.
- When the cursor is on the last row, pressing Tab or Enter automatically creates a new rule row.
These shortcuts allow you to build large rule lists more efficiently.
Save and Reuse Frequently Used Replacement Tasks
If you regularly perform the same find-and-replace operations, Batch Replace allows you to save the current settings as a scenario. A scenario can store replacement rules, search options, and even selected files or folders, making it easy to reuse complex configurations without rebuilding them each time.

Create a New Scenario
Click New to create a new scenario.
If the current rule list contains unsaved changes, a confirmation message will pop up to remind whether to clear the current rules.

Save a Scenario
After configuring your replacement rules, click Save to save the current settings as a scenario.

When saving a scenario for the first time, you need to:
- Enter a scenario name.
- Optionally select Also save the selected folders and file list to this scenario.
- Click OK.


If the Also save the selected folders and file list to this scenario option is enabled, Batch Replace saves not only the replacement rules but also the currently selected files and folders.
This is useful when the same documents need to be processed repeatedly.
Save a Copy of an Existing Scenario
Click Save As to create a copy of the current scenario.

Enter a new scenario name, check the Also save the selected folders and file list to this scenario box if needed, and then click OK to save the copy.

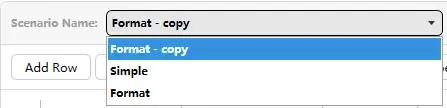
Load a Saved Scenario
All saved scenarios are displayed in the Scenario Name drop-down list.
To load a scenario:
- Open the Scenario Name drop-down list.
- Select the desired scenario.

If the scenario contains saved files or folders, Batch Replace displays the following prompt.
Select:
- Yes to load both the replacement rules and the saved files/folders.
- No to load only the replacement rules.
Click OK to continue.


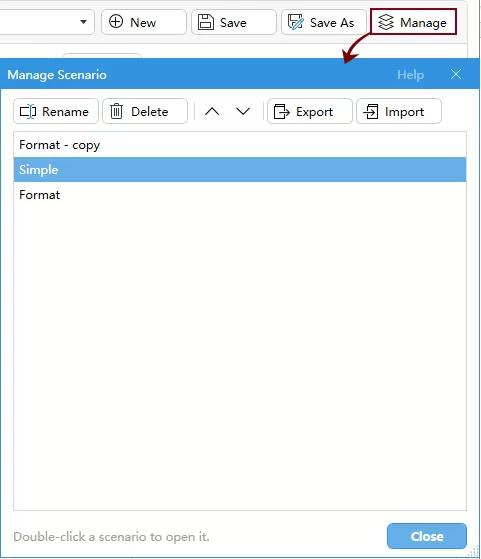
Manage Existing Scenarios
Click Manage to open the Manage Scenario dialog box. Then you can manage all saved scenarios from a single location.
- Rename a ScenarioSelect a scenario and click Rename. Enter a new name and save the changes.
- Delete a ScenarioSelect a scenario and click Delete to permanently remove it.
- Reorder ScenariosUse the Move Up and Move Down buttons to adjust the display order of scenarios.
- Export ScenariosClick Export to save one or more scenarios to a file.
- Import ScenariosClick Import to load previously exported scenarios.

Export Reports
To generate a detailed operation report, select the Generate Report checkbox before clicking Find or Replace.
After the operation is completed, Batch Replace automatically creates a new Word document containing:
- The date and time of the operation
- A summary of the processed files
- The number of successful and failed operations
- The search and replacement rules used
- Detailed results for each processed file
- The number of matches found for each rule
The generated report provides a complete audit trail of the batch find or replace operation, making it easier to review, verify, and share the results.

Conclusion
Batch Replace is much more than a simple find-and-replace tool. It enables you to update text, formatting, and special characters across multiple Word documents, TXT files, and HTML files in a single operation.
With support for Simple Mode, Advanced Mode, reusable scenarios, detailed reporting, and powerful search options, Batch Replace helps you complete large-scale editing tasks faster, more accurately, and with less manual effort.
Best Office Productivity Tools
Kutools for Word - Elevate Your Word Experience with Over 100 Remarkable Features!
🤖 Kutools AI Features: AI Assistant / Real-Time Assistant / Super Polish (Preserve Format) / Super Translate (Preserve Format) / AI Redaction / AI Proofread...
📘 Document Mastery: Split Pages / Merge Documents / Export Selection in Various Formats (PDF/TXT/DOC/HTML...) / Batch Convert to PDF...
✏ Contents Editing: Batch Find and Replace across Multiple Files / Resize All Pictures / Transpose Table Rows and Columns / Convert Table to Text...
🧹 Effortless Clean: Sweap away Extra Spaces / Section Breaks / Text Boxes / Hyperlinks / For more removing tools, head to the Remove group...
➕ Creative Inserts: Insert Thousand Separators / Check Boxes / Radio Buttons / QR Code / Barcode / Multiple Pictures / Discover more in the Insert group...
🔍 Precision Selections: Pinpoint Specific Pages / Tables / Shapes / Heading Paragraphs / Enhance navigation with more Select features...
⭐ Star Enhancements: Navigate to Any Location / Auto-Insert Repetitive Text / Toggle Between Document Windows / 11 Conversion Tools...
🌍 Supports 40+ Languages: Use Kutools in your preferred language – supports English, Spanish, German, French, Chinese, and 40+ others!

Office Tab - Brings Tabbed interface to Office, Make Your Work Much Easier
- Enable tabbed editing and reading in Word, Excel, PowerPoint, Publisher, Access, Visio and Project.
- Open and create multiple documents in new tabs of the same window, rather than in new windows.
- Increases your productivity by 50%, and reduces hundreds of mouse clicks for you every day!
✨ Kutools for Office – One Installation, Five Powerful Tools!
Includes Office Tab Pro · Kutools for Excel · Kutools for Outlook · Kutools for Word · Kutools for PowerPoint
📦 Get all 5 tools in one suite | 🔗 Seamless integration with Microsoft Office | ⚡ Save time and boost productivity instantly
Best Office Productivity Tools
Kutools for Word - 100+ Tools for Word
- 🤖 Kutools AI Features: AI Assistant / Real-Time Assistant / Super Polish / Super Translate / AI Redaction / AI Proofread
- 📘 Document Mastery: Split Pages / Merge Documents / Batch Convert to PDF
- ✏ Contents Editing: Batch Find and Replace / Resize All Pictures
- 🧹 Effortless Clean: Remove Extra Spaces / Remove Section Breaks
- ➕ Creative Inserts: Insert Thousand Separators / Insert Check Boxes / Create QR Codes
- 🌍 Supports 40+ Languages: Kutools speaks your language – 40+ languages supported!