Create a drop cap in Word and Google Docs – Step by step tutorial
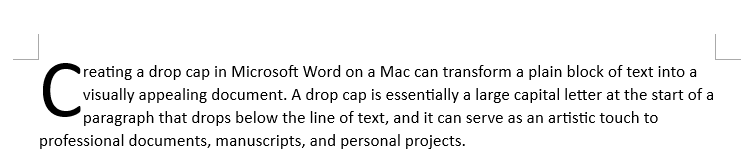
A drop cap is a stylistic feature used at the start of a paragraph to grab the reader's attention and improve the aesthetic of a document. It consists of a large capital letter that spans several lines of text, adding a decorative flair. Here’s a step-by-step tutorial on how to create a drop cap in Microsoft Word on both Windows and Mac, as well as in Google Docs.

Create a drop cap in Word on Windows
Create a drop cap in Word on Windows
Here is a detailed, optimized step-by-step guide to help you easily create a drop cap in Word on a Windows system.
- Open your Word document. Click on the beginning of the paragraph where you want to add a drop cap.
- Then, click Insert > Drop Cap, you’ll see a few different styles to choose from: None, Dropped, and In margin. See screenshot:
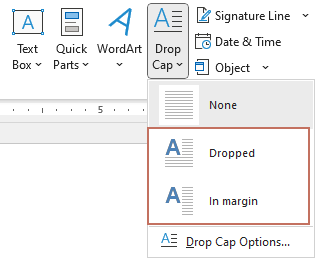
- Select the drop cap option you need. After specifying, Word will automatically apply the drop cap to the first letter of the paragraph.
- Dropped: makes the letter drop into the paragraph, aligning with the text.
- In margin: places the letter in the margin, outside the normal text area.

- Dropped: makes the letter drop into the paragraph, aligning with the text.


- If you want to customize the appearance of your drop cap beyond the default settings, start by selecting the drop cap in your document. Then navigate to Insert > Drop Cap > Drop Cap Options for a variety of customization choices:
- Font: Change the font of the drop cap to differentiate it from the rest of your text. This change will only affect the drop cap, not the other text in your document.
- Lines to drop: Adjust this setting to modify the size of your drop cap, specifically how many lines it spans.
- Distance from text: This option lets you set the spacing between your drop cap and the adjacent text, allowing for better alignment and spacing.

- To further enhance your drop cap with additional styling, such as changing the font color or adding shadows, first select the drop cap. Then, explore various formatting options under Home tab of the Font group. Here, you can customize the color, add shadow effects, and apply other stylistic modifications to make your drop cap stand out.
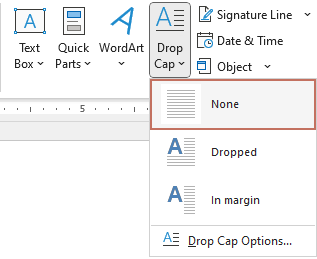
- To remove the drop cap, highlight the large drop cap letter, then, click Insert > Drop Cap > None. See screenshot:


Create a drop cap in Word on Mac
Creating a drop cap in Microsoft Word on a Mac is slightly different from the process on Windows. Please follow these steps to proceed:
- Open your Word document. Click on the beginning of the paragraph where you want to add a drop cap.
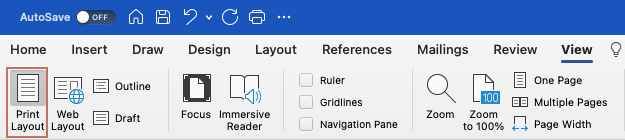
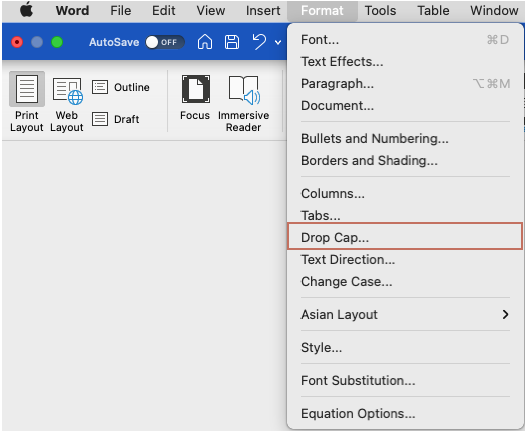
- Go to View tab, click Print Layout, see screenshot:
- Then, go to the Format menu, and click Drop Cap, see screenshot:
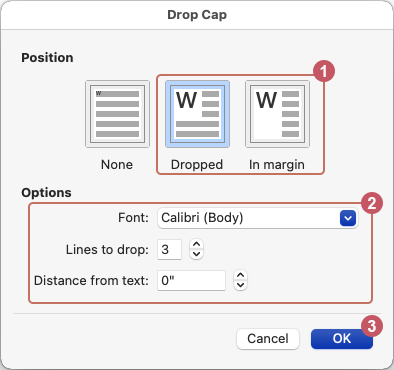
- In the Drop Cap dialog box, specify the following operations:
- Choose Dropped or In margin option as you need;
- Specify the font, lines to drop and distance from text for the drop cap letter to meet your need from the Options section;
- At last, click OK button.
- Now, you can see, Word will automatically apply the drop cap to the first letter of the paragraph.


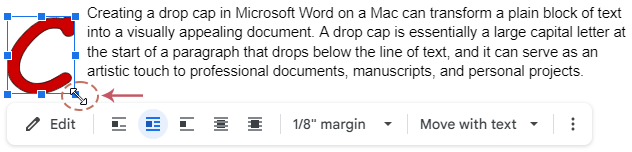
- After inserting the drop cap, you might want to customize its appearance. Select the drop cap letter first. Then, explore various formatting options under Home tab of the Font group. Here, you can customize the color, add shadow effects, and apply other stylistic modifications to make your drop cap stand out.
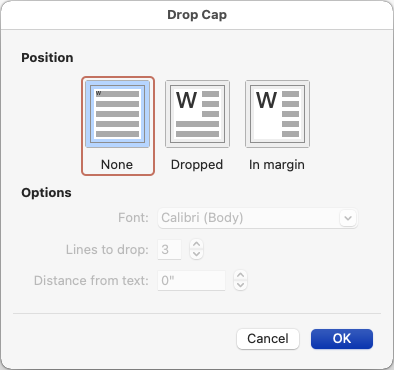
- To remove the drop cap, highlight the large drop cap letter, then, click Format > Drop Cap. In the Drop Cap dialog box, select None. See screenshot:

Create a drop cap in Google Docs
You can enhance your document with a decorative touch by adding a drop cap. Although Google Docs doesn't provide a built-in drop cap feature like Microsoft Word, you can easily create one yourself in just a few steps.
Step 1: Create a drop cap in Google Docs
- Open your Google docs. Click on the beginning of the paragraph where you want to add a drop cap.
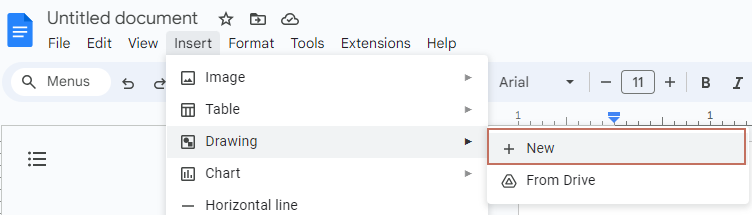
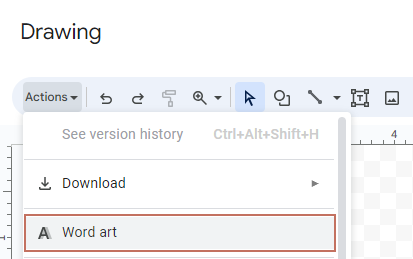
- Then, click Insert > Drawing > New, see screenshot:
- In the Drawing window, click Actions > Word art, see screenshot:
- In the text box, enter the letter that you want to use for the drop cap, and then press Enter key.

- Once your letter is displayed in the drawing window, you have the flexibility to customize it extensively using the toolbar at the top.
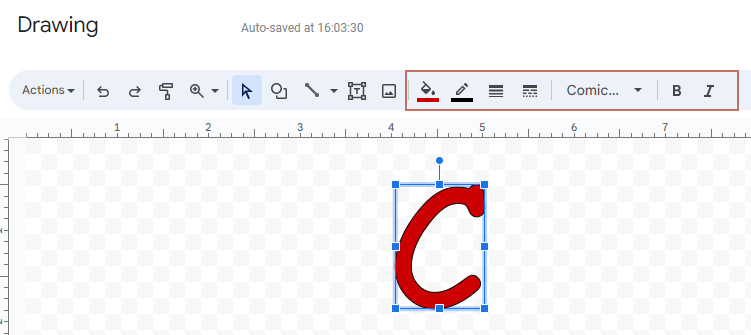
- After formatting the letter, click Save and Close button in the Drawing window. Now, you can see the drop cap at the beginning of your Google Docs document. See screenshot:


Step 2: Wrap the text around the drop cap letter
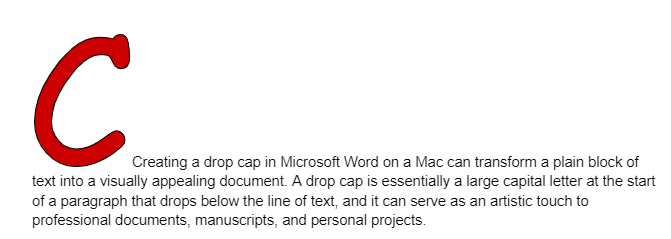
By default, Google Docs aligns the drop cap with the first line of the paragraph. To adjust the drop cap so it spans multiple lines of text, follow these steps:
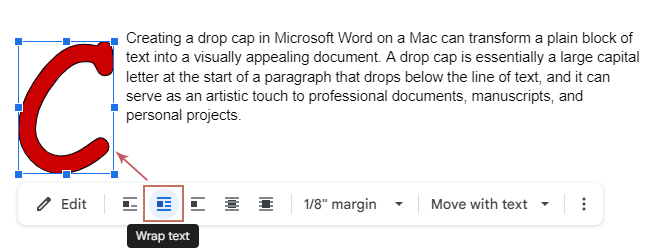
- Click to select the drop cap letter, a small toolbar menu will appear beneath it. Click Wrap text, you'll see the surrounding text adjust to wrap around your drop cap. see screenshot:
- To resize your drop cap after text wrapping, simply select the letter and drag from one of the corners to adjust its size. See screenshot:
- At last, delete the initial letter of the paragraph after creating a drop cap to prevent duplication. See screenshot:


This guide has detailed the process for creating and customizing drop caps in Microsoft Word and Google Docs. By following these instructions, you can add an artistic touch to your documents, enhancing their visual appeal and readability. To explore more tips and tricks for Microsoft Word, please click here to view additional options.
Generate tailored content with Kutools for Word's AI feature
Transform your document creation process with Kutools AI Assistant's tailored content generation feature. Whether crafting a detailed report, composing compelling emails, or developing engaging presentations, Kutools AI Assistant molds your ideas into polished, ready-to-use text. Let Kutools AI Assistant be your partner in writing success, tailoring content that resonates and impresses. To use this Kutools AI Assistant of Kutools for Word, please download and install Kutools for Word first.
Related Articles:
- Insert or put a line over text in Word
- In Word document, we can quickly and easily insert an underline to a word or sentence, but, have you ever tried to insert a line over or above texts? This article, I will talk about how to put a bar or line over texts in Word document.
- Master Columns in Word: A Comprehensive Guide
- Columns are a fundamental aspect of design in Microsoft Word that can transform a plain document into an engaging, easy-to-read piece. Ideal for newsletters, brochures, or dual-language documents, columns help manage and present text stylishly. This guide provides a detailed, step-by-step approach to adding columns and column breaks in Word document.
- Put one picture on top of another in Word
- In Word document, we can quickly insert multiple pictures at once. Sometime, you need to place a smaller image on top of another larger image. Normally, you can’t drag one image above another image directly. This article, I will talk about how to put one picture on top of another in Word document.
- Apply and create custom multilevel Lists in Word
- A multilevel list is a list with items categorized in multiple tiers or levels. Each level has a different indent or numbering style to show the hierarchy and relationship between items. This kind of list allows you to present information in layered levels of detail, making complex data easier to understand and navigate.
Best Office Productivity Tools
Kutools for Word - Elevate Your Word Experience
🤖 Kutools AI Features: Generate Content / Rewrite Text / Document Q&A / Get Quick Answers / Translate documents / Polish Document (Preserve Format)...
📘 Document Mastery: Split Pages / Merge Documents / Export Selection in Various Formats (PDF/TXT/DOC/HTML...) / Batch Convert to PDF...
✏ Contents Editing: Batch Find and Replace across Multiple Files / Resize All Pictures / Transpose Table Rows and Columns / Convert Table to Text...
🧹 Effortless Clean: Sweap away Extra Spaces / Section Breaks / Text Boxes / Hyperlinks / For more removing tools, head to the Remove group...
➕ Creative Inserts: Insert Thousand Separators / Check Boxes / Radio Buttons / QR Code / Barcode / Multiple Pictures / Discover more in the Insert group...
🔍 Precision Selections: Pinpoint Specific Pages / Tables / Shapes / Heading Paragraphs / Enhance navigation with more Select features...
⭐ Star Enhancements: Navigate to Any Location / Auto-Insert Repetitive Text / Toggle Between Document Windows / 11 Conversion Tools...

Best Office Productivity Tools
Kutools for Word - 100+ Tools for Word
- 🤖 Kutools AI Features: Generate, Rewrite, Summarize, Translate Documents / Get Quick Answers / Polish Document (Preserve Format)
- 📘 Document Mastery: Split Pages / Merge Documents / Batch Convert to PDF
- ✏ Contents Editing: Batch Find and Replace / Resize All Pictures
- 🧹 Effortless Clean: Remove Extra Spaces / Remove Section Breaks
- ➕ Creative Inserts: Insert Thousand Separators / Insert Check Boxes / Create QR Codes