Insert an interactive and programmable checkbox (ActiveX controls) in Word
ActiveX checkboxes are useful in creating interactive and dynamic documents. If you're looking to add functionality that requires more than just basic form filling - such as integrating with other Office applications, automating tasks through VBA, or enabling complex user interactions - then ActiveX control checkboxes are an excellent choice. These controls are highly customizable and can be programmed to react to user actions, making them ideal for advanced Word users who need to incorporate sophisticated elements into their documents. In this guide, we will walk you through the steps to successfully insert and configure an ActiveX control checkbox in Word.
Recommended Productivity Tools for Word
Kutools for Word: Integrating AI 🤖, over 100 advanced features save 50% of your document handling time.Free Download
Office Tab: Introduces the browser-like tabs to Word (and other Office tools), simplifying multi-document navigation.Free Download
Insert an ActiveX control checkbox in Word with the Developer tab
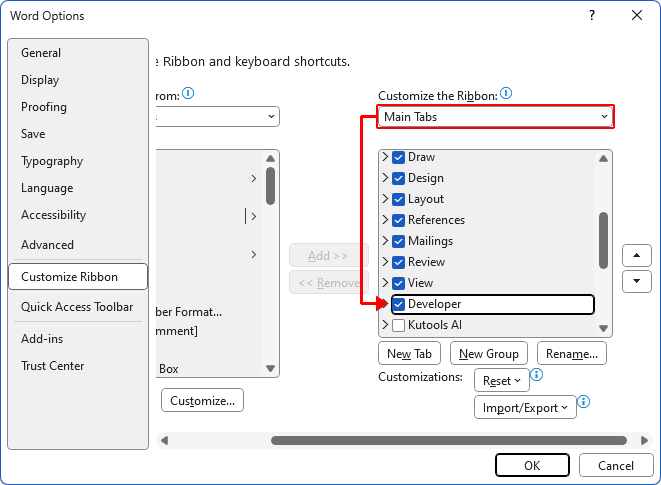
Step 1: Enable the Developer tab (Skip if Developer is already on your Word ribbon)
- Click File > Options > Customize Ribbon.
- Under the Main Tabs, check the Developer box and click OK.

Step 2: Insert the ActiveX control checkbox
On the Developer tab, in the Controls group, click Legacy Tools > Check Box (ActiveX Control).

Result
An ActiveX checkbox will be inserted at the location of your cursor.

Note: You can select the inserted checkbox and press Ctrl + C to copy it, then paste it wherever needed using Ctrl + V.
Office Tab: Brings tabbed interfaces to Word, Excel, PowerPoint... |
Enhance your workflow now. Learn More about Office Tab Free Download |
Insert an ActiveX control checkbox in Word with Kutools for Word
If you prefer not to use the Developer tab, Kutools for Word provides an alternative with its Check Box utilities for quickly inserting ActiveX checkboxes.
On the Kutools tab, click Check Box > Check Box (AvtiveX Control).

Result
An ActiveX control check box is inserted at the location of your cursor.
Notes:
- You can select the inserted checkbox and press Ctrl + C to copy it, then paste it wherever needed using Ctrl + V.
- Want to access the Check Box utility? Download Kutools for Word now! Beyond this, Kutools boasts a myriad of 100+ other features and offers a 60-day free trial. Don't wait, give it a try today!
Edit an ActiveX control checkbox in Word
Editing an ActiveX control checkbox in Word involves changing its properties, appearance, or associated VBA code. Here’s a step-by-step guide on how to edit an ActiveX control checkbox in Word:
Step 1: Enter Design Mode
On the Developer tab, in the Controls group, click Design Mode to make the button appear pressed.

Step 2: Edit the checkbox properties
- Right-click on the ActiveX control checkbox you want to edit, and select Properties.

- In the Properties window, you can modify various attributes of the checkbox, such as:
- Name: Change the name of the checkbox for easier reference in VBA code.
- Caption: Change the text label of the checkbox.
- Value: Set the default state (True for checked, False for unchecked).
- Font: Customize the font style and size of the caption.
- BackColor/ForeColor: Change the background and text color of the checkbox.
- ...... (In the picture below, I changed the caption, and it applies immediately to the checkbox.)


Step 3: Exit Design Mode
Click Design Mode again in the Controls group of the Developer tab to exit design mode.
Related articles
- How to insert a checkbox in Word (Interactive and print-only)
- How to insert check box form field in Word documents?
- Add a check mark or tick symbol in Microsoft Word
Best Office Productivity Tools
Kutools for Word - Elevate Your Word Experience with Over 100 Remarkable Features!
🤖 Kutools AI Features: Generate Content / Rewrite Text / Document Q&A / Get Quick Answers / Translate documents / Polish Document (Preserve Format)...
📘 Document Mastery: Split Pages / Merge Documents / Export Selection in Various Formats (PDF/TXT/DOC/HTML...) / Batch Convert to PDF...
✏ Contents Editing: Batch Find and Replace across Multiple Files / Resize All Pictures / Transpose Table Rows and Columns / Convert Table to Text...
🧹 Effortless Clean: Sweap away Extra Spaces / Section Breaks / Text Boxes / Hyperlinks / For more removing tools, head to the Remove group...
➕ Creative Inserts: Insert Thousand Separators / Check Boxes / Radio Buttons / QR Code / Barcode / Multiple Pictures / Discover more in the Insert group...
🔍 Precision Selections: Pinpoint Specific Pages / Tables / Shapes / Heading Paragraphs / Enhance navigation with more Select features...
⭐ Star Enhancements: Navigate to Any Location / Auto-Insert Repetitive Text / Toggle Between Document Windows / 11 Conversion Tools...

Best Office Productivity Tools
Kutools for Word - 100+ Tools for Word
- 🤖 Kutools AI Features: Generate, Rewrite, Summarize, Translate Documents / Get Quick Answers / Polish Document (Preserve Format)
- 📘 Document Mastery: Split Pages / Merge Documents / Batch Convert to PDF
- ✏ Contents Editing: Batch Find and Replace / Resize All Pictures
- 🧹 Effortless Clean: Remove Extra Spaces / Remove Section Breaks
- ➕ Creative Inserts: Insert Thousand Separators / Insert Check Boxes / Create QR Codes